NeoChrome
The best graphics Tool for the Atari ST

How about a little time travelling back into the old days, when Atari
was still in charge, the Union demo was just released and the pixel
pushers were separated into hostile groups: The Degas scrawlers and the
NeoChrome painters. Erik Simon aka ES / TEX decided to add some fuel to
the fire with this earth - shattering article. It was originally
published in a German magazine called "Public Domain", which I
purchased just because of this article in 1989. Lean back and enjoy
Eriks enlightments about NeoChrome V1.0 :)

Every ST user knows it. Even fanatical followers of the monochrome
monitor have at least heard of it. It went along with the history of the
ST from the very beginning. Nearly everybody has a copy, but only a few
know about its value. Sharp-witted readers of our headline already know
what we are talking about: NeoChrome, the granddad of all graphics
programs for the Atari ST!
It all began in the first days of the delivery of the "Sixteen-
Thirtytwo". Beside such outstanding products of coding wizardry and
speed, like Logo and the 1st ST Basic (argh!) one could discover a small
(approximately 30 kb) program called NEO.PRG on the included disks. It
was the version 0.5, which threw dozens of colours (in the colour menu)
at the lucky owners of a colour monitor. The coder of this little piece
of art, and of the later versions, was Dave Staugas, who was a system
programmer at Atari and co-author of the operating system. Together with
the most famous picture of its time, (do you remember the magnificent
waterfall?) NeoChrome was a "real" PD program, which was permitted
distribution by Atari via authorised dealers.

Somewhat later, a new version 0.6 circulated within the atariscene. It
contained some additional menu entries, which all had a common
disadvantage, in that they didn't work. Since this version also had the
annoying habit of copying the menu into the underlying picture, you can
forget about v0.6. It seems an unfinished beta version was snatched from
the hands of Mr. Staugas.

Some months had passed when something happened which was long awaited by
the author of these lines: NeoChrome v1.0 was here! Enriched with some
important menu items it was a professional tool to create pictures and
games. We will return to this topic later. One has to say that strictly
speaking, NeoChrome v1.0 wasn't a public domain program any more. Atari
should have sold it, but this never happened and in addition to that,
the Atari dealers treated NeoChrome v1.0, just like all previous
versions, as public domain. So it is assumed that today everybody who is
interested in painting programs, owns a copy of NeoChrome version 1.0.

Mr. Staugas wasn't too enamoured of Atari's mistake, which is amongst
other things, the explanation for the absence of any official NeoChrome
update. But even in its current state NeoChrome v1.0 is a very
convincing tool.

Before we start a detailed description of all functions, I want to list
the basic advantages of NeoChrome. The very best feature of NeoChrome is
without a doubt the magnifier. It is fast and can be used with all(!)
functions. Anybody who hasn't just set some pixels in "zoom-mode" but
drawn lines, cut blocks and so on with that magnifier won't be keen on
using another program again. Besides which, NeoChrome is fast, very fast
(use any other painting program on ST or Amiga and try to draw a filled
circle or to do stageless diminution!). It contains (nearly) all
functions necessary for the creation of stunning pictures, and doesn't
hassle its user with a bunch of menu items that he won't need at all.

The sophisticated menu design allows selecting colours and using all
functions very quickly. Last not least, NeoChrome contains functions and
interfaces that allow you to create animated graphics, and to include
them in your own programs. Eventually we will look at all those details.
Below I will explain all menu items from the top to the bottom, and from
the left to the right; I will explain the obvious functions as well as
the "hidden" ones.
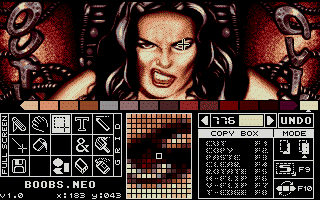
The
Colour Palette
At the top of the menu part of the screen you can find the sixteen
colours which can be used to paint your picture. With a left click you
can select the colour which you want to use for painting. A small
triangle will appear beneath the colour. Two of the colours will show a
"pike" or "vertex". Point to a colour register with a vertex and press
the right mouse button, now you can move the "vertex". With those
"pikes" you are selecting a range of colours, which is used for lots of
operations. The little box at the upper right, beside the UNDO box, also
belongs to the palette. You can modify the colours with it. Click with
the left (adds 1) or the right (subtracts 1) mouse button onto the
ciphers inside the box to adjust the RGB values.

If you like the tint, then perform a double click onto the colour field
at the right side of the ciphers. The colour will be transferred into
the selected colour register. A double click onto a colour register will
transfer the colour value of the register into the colour adjustment
box. You can also fetch a colour directly from the colour menu in the
middle; a double click onto the desired colour is enough. The colour
menu can be moved to get access to all 512 colours of the ST. Simply
change to the colour menu, click the right mouse button and move the
mouse to the left or right.
Colour
Palette Animation
(Colour Cycling)
The two arrows left and right beside the colour adjustment box are used
for palette animation. Thereby the colours in the area between the two
colour registers with the "pikes" (see above) will be rotated. This way
you can generate nice effects, like for example streaming water. The two
arrows are pointing in the direction of the colour exchange. Clicking on
an arrow with the left mouse button shifts the colours in single steps
into the selected direction. The right mouse button causes a repeated
colour cycling. The speed of the colour cycling can be adjusted like
that:

     Colour cycling to the left:
     Left mouse button  - faster
     Right mouse button - slower

     Colour cycling to the right
     Left mouse button  - slower
     Right mouse button - faster

The colour cycling can be stopped, by clicking on the opposing arrow.
This may sound more complicated than it actually is; just give it a try,
soon you will get used to it.
Full Screen
Hides the menu area so you can use the selected drawing function on the
full screen. Pressing "ESC" causes the same.
Jack Knife
Jack Knife allows you to cut irregular blocks. To my knowledge no (!)
other painting program supports such a function. You can draw an
arbitrary line with the left mouse button (like freehand painting)
around an area. This area will be transferred into a brush after the
release of the mouse button. CUT cuts the area, COPY makes a copy, CLEAR
erases the outlined area, and PASTE puts the content of the area back
onto the screen. All these functions can also be used with the function
keys. The outlined brush can be moved over the screen with the left
mouse button. If you click outside of the brush it will be "glued" onto
the screen. Something, that isn't too well known, is the fact that you
can paint with this brush if you press the RIGHT mouse button! I am
aware of several painting programs that need at least one menu entry for
this simple button action.

Furthermore you can adjust three different modes in the bottom right
corner of the jack knife menu. The first mode will write the background
pixels of the brush to the screen, the brush is "opaque". The second
mode does the opposite, the background pixels of the brush become
"transparent". The last mode is again unique to NeoChrome. It inserts
the brush in the Background of the graphic that is already on screen,
which causes a stunning effect.

Jack Knife is one of the outstanding parts of NeoChrome, it's extremely
useful for the creation of animations (copying of body parts etc.).
Grabber
You can move the screen area above the menu in vertical directions with
the grabber. Just move your hand-shaped mouse pointer into the picture
area, press the left mouse button and move the mouse up or down. Again
there is a "hidden function". If you click the right mouse button, a
"pick colour" function is executed; the little white triangle below the
colour palette jumps to the colour register of the pixel you have
clicked within the picture.
Copy Box
The copy box contains copy functions of all kinds, and a very useful re-
colouring option. With the copy box activated you can create a
rectangular frame by pressing the left mouse button. The following
actions can be applied within this area: CUT, COPY, PASTE, CLEAR as the
two different modes are equivalent to the jack knife and don't need
further descriptions. ROTATE rotates the area by 90 degrees (who would
have thought of that). H-FLIP and V-FLIP mirror the image horizontally
and vertically respectively. T-EDGE is a remarkable function. Its impact
can be viewed best, if you frame a single colour graphic, select the
colour of the graphic in the palette and click onto T-EDGE. The graphic
will be hollowed out and provided with an outline. Your rightful
question might be "What in the world do I need that for?"

Well, this menu entry is the proof that Dave Staugas is a pro with lots
of practical experience.

This function is very useful to generate masks for "Shapes" (moving
characters), that are one pixel bigger than the shape itself. Later in
the program, the shape gets an outline, which makes it easier to
distinguish from the background. The big S is used to activate the
seamless up- and downsizing. Click onto it, create the usual frame
inside the picture, move to the bottom right corner of the frame
(amazingly useful magnifier, isn't it?), keep the left mouse button
pressed and move the mouse. The graphic can be sized to any desired
dimension. It's also possible to pull the graphic somewhere inside the
selected frame but this doesn't offer the same degree of control like
the corners.

The last function of the copy box is the colour exchange function at the
bottom right corner of the panel. Again this menu item can't be found in
other programs so it's indispensable in practice. As is generally known
each of the possible 16 colours of a picture is represented by a 4-bit
pattern (4 planes), which addresses the corresponding colour register.
This function is capable of exchanging two bit patterns of a picture (or
of a framed area) or to translate them into another one. This can be
used in many different ways. Let's assume you want to delete a colour
from your picture: Just convert the bit pattern of that colour into the
background colour! Perhaps your picture has four tones of blue in the
colour registers 1-4. Now you want to transfer a blue sphere from
another picture which uses five shades of blue in the colour registers
11-15. Just translate the bit patterns of the sphere! Or you have
already used all 16 colours of your picture, when you realize that you
desperately need another colour. Just transfer two bit patterns of
similar colours into one of them and you can allocate the freed colour
register with your new colour. The possibilities of this function are
many.

It's used as follows: If you want to exchange two-bit pattern, you move
the "pikes" onto the desired colours. Make sure the little white
triangle doesn't point to one of the two colours. Create a frame if you
only want to recalculate only a part of the picture. Click onto the
recalculation function. You will see that the two colours, (or more
exactly their bit patterns) have been exchanged. Now you can exchange
the colour values in the colour registers and seemingly everything is
like before. If you want to convert a bit pattern into another one, you
execute the same steps, but you make sure that the little white triangle
is located below your destination colour. All block functions can also
be used with the function keys.

------------------------------------------------------------------------
About the author of these lines: Erik Simon has been using graphics
programs on the C-64 and the Atari ST for several years. Six months ago,
he turned his hobby into his profession. The graphics for the following
games have been created by him: "To be on Top" (Rainbow Arts, already
released), "Warp" (Thalion Software GmbH, will be released soon), and
"Dragonflight" (Thalion Software GmbH, will be released in the summer).
------------------------------------------------------------------------

A little hint: Pressing the right mouse button inside the block, copies
the graphic onto the underlying background graphic, without losing the
frame.
Text
You can use all variations of the system font with the text function.
The menu doesn't need much explanation. ALIGN determines if the text is
written to the right, left or centre. FACE switches between the normal
letters and symbols of the ST font. If you have selected your font, you
can place the cursor wherever you want in the picture. Clicking the left
mouse button once allows you to write from there. Colour, text size and
attributes can be changed while writing.
Pencil
This is the "normal" pen. The left mouse button draws with the selected
colour, and the right deletes the pixels.
Line Draw
Within the line draw menu, the thickness of the line is determined. Keep
the left mouse button depressed, to create a single coloured line. Use
the right mouse button, to create a line that is divided into the
colours from the colour area between the "pikes" (This creates beautiful
effects in combination with colour cycling!). If you press the other
mouse button while drawing a line, it vanishes.
Area Fill
This function fills a single coloured area with the selected colour,
apart from that it can be considered harmless.
Miscellany
(The "&"
Menu)
This menu entry contains several useful little functions: UNDO COLOR
undoes a just performed change within the colour registers. UNDO PALETTE
does the same for all colour registers. These menu entries also work
after loading a new picture and tend to be quite useful there.

"X:/Y:" toggles the coordinate display between on and off. Extremely
useful for programmers are the CUT and MASK functions. CUT automatically
adjusts a cut block to a word boundary and saves it as SOURCE CODE(!)
(Format DC.W $0010,$5050,...). MASK is very similar but it saves a 1-
plane mask of the block as source code. This way you can easily insert
your graphic into assembler programs.
Brushes
Different brushes become the drawing tool. And there is another goodie
available: If you use the right mouse button to draw, the brush will
cycle the colours inside the colour area, which has already been
mentioned. Again you can create nice effects in combination with colour
cycling.
Disk
The left mouse button saves a picture. Besides you can leave the program
here. With the right mouse button you can load a picture.
Shapes
All kinds of circles, ovals, rectangles and polygons, filled or not,
with or without borders, can be created here. The usage is quite easy
and doesn't need any further explanations. Please take note of the
drawing speed.
Eraser
The "India rubber". A small rectangle is used to delete huge areas. A
double click with the left mouse button deletes the visible screen area
(Caution! There's no security confirmation!). A double click with the
right mouse button deletes the entire picture, after a confirmation
dialogue.
Nozzles
Behave like brushes but differently (!?). In short, the strokes of the
brush are not "tracked" by the program. So you will get a spray paint
effect, if you move the mouse fast in a small area. The trick with the
right mouse button works here as well.
Grid
Fixes all mouse movements into an 8*8-grid.

Finally there is another hot hint and a little joke! There is an
animation tool hidden deep inside NeoChrome V1.0! Unfortunately, Dave
Staugas didn't finish it in time and so he concealed it. Before I tell
you how to activate the hidden program part, I want to remind you, that
the animation tool isn't fully finished. It's not wise to press UNDO, or
to hide the menu while the animation option is selected. It is a good
idea to save your picture BEFORE you use the animation tool. However
don't get scared, I have been working with the animation tool for 1.5
years now, and if you know the unfinished parts, then it is a real help.
It is very simple to use and the animations can be corrected on the fly
without the need to change the program. To get access to the animation
tool, you select the GRABBER. Then you move your mouse pointer exactly
into the belly of the 2nd "R" of the word "GRABBER" (on the right) and
press the right mouse button. Spookily a little camera appears beside
the "DISK", icon and the animation tool appears!
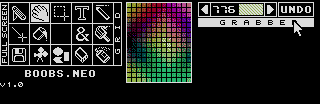
NeoChrome contains a concealed aninmation tool
Animate
Drag a frame sized like the character you want to animate with the left
mouse button. Now keep the right mouse button pressed. You can move the
whole picture through the selected area, until the desired character
fits into the selected area. Click onto "ADD" within the animation menu,
to use the character as an animation frame. Now you can move the next
animation phase of your character into the frame, another "ADD" and so
on. Afterwards you move the frame to the 1st character again (No, I
don't know why it has to be this way?) With the arrows from the
animation menu, you can check the single frames of the animation. The
usage of those arrows is very similar to the usage of the arrows with
the palette animation. "LOAD" and "SAVE" work but don't be frightened by
the not properly restored file selector box.

The last special feature in NeoChrome, is a file called NEO.MCP. On
starting up, the program searches for this file. You can determine the
colours within the colour menu with this file. The file needs to contain
512 words with the desired colour values.

After getting to know all these NeoChrome secrets, you surely agree with
me that this program deserves a position at the top of the graphic tool
hall of fame!

It is a pity that it didn't earn much money for its author. Some time
ago I  sent Dave Staugas a considerable amount of "Deutschmark" along
with lots of praise about his program. In response, Dave wrote that he
actually didn't intend to work any more on NeoChrome, but if more
constructive feedback like this arrives, he would get back to the old
sources and implement some improvements. Therefore I am asking you to do
something:

If you use NeoChrome frequently, or if you are planning to use it,
please send the good Mr. Staugas a small monetary tribute. Perhaps we
are seeing NeoChrome 2.0 some day. You can reach him under the following
address:

Atari Corp
Personal Mr. Dave Staugas
1196 Borregas Ave.
Sunnyvale
California 94088-3421
U.S.A.

ES / Tex for Public Domain Software,May 1989

Please note that this address is outdated since several years :) and I
am in deep doubts if there will ever be a NeoChrome V2.0, but perhaps
you want to check out all the stuff mentioned in the article, so go to
DHS download NeoChrome V1.0 and have some fun with it.

Roughly translated by Cyclone/X-Troll for Alive Magazine, 2005-05-13
|